PXW-FX9V / PXW-FX9T can initiate FTP, FTPES transfer of high-resolution original clips, proxy clips, partial clips over built-in Wi-Fi; wired Ethernet via XDCA-FX9; USB cellular modem. The documented route accepts a user-configured server; it is suitable for a destination-neutral ingest gateway after protocol, firmware, and payload testing.
Menu path: Network → Connection > Network → File Transfer → Server Settings > File Transfer / Thumbnail → Transfer > Network → File Transfer → Auto Upload. Protocols: FTP · FTPES. Sends: high-resolution original clips · proxy clips · partial clips.
Documented from the manufacturer manual. Sources reviewed .
Transportbuilt-in Wi-Fi + wired Ethernet via XDCA-FX9 + USB cellular modem
Payloadhigh-resolution original clips · proxy clips · partial clips
Triggersmanual, auto upload, and chunk proxy transfer on supported firmware
Before you touch the menu
What to gather
01Use the documented network path: built-in Wi-Fi; wired Ethernet via XDCA-FX9; USB cellular modem.
02Install or attach the required components: XDCA-FX9 expansion unit for wired Ethernet; supported cellular modem for mobile broadband.
03Prepare a reachable FTP, FTPES endpoint with a writable destination and a camera-specific credential.
04Firmware/license qualification: C3 chunk/high-res relink workflows cite version 3.00 or later for some settings.
Connection fields
Server Name
An operator-facing destination label.
Distinguishes the production ingest endpoint from vendor-cloud presets or prior assignments.
Server Address / URL
The DNS host or IP value specified by the FTP endpoint.
Directs the camera or adapter to the destination-neutral server.
Protocol / secure connection
A mode explicitly supported by this path: FTP, FTPES.
Must match the listener and its certificate/security configuration.
Port
The port issued with the ingest credential.
Avoids relying on defaults when the gateway uses a dedicated listener.
User Name / Password
A least-privilege credential unique to the camera or event.
Permits isolation, audit, and fast revocation.
Destination Directory
The assigned remote folder, without adding an unverified web URL prefix.
Routes clips into the correct job inbox.
Active / Passive
Match the server; passive is normally required through venue NAT.
Controls how the FTP data channel is opened.
Root Certificate
The trusted CA root required by the FTPS/FTPES server, in the format specified by Sony.
Allows TLS server validation instead of bypassing certificate errors.
The menu, step by step
01
Network → Connection
Activate a supported route: built-in Wi-Fi; wired Ethernet via XDCA-FX9; USB cellular modem.
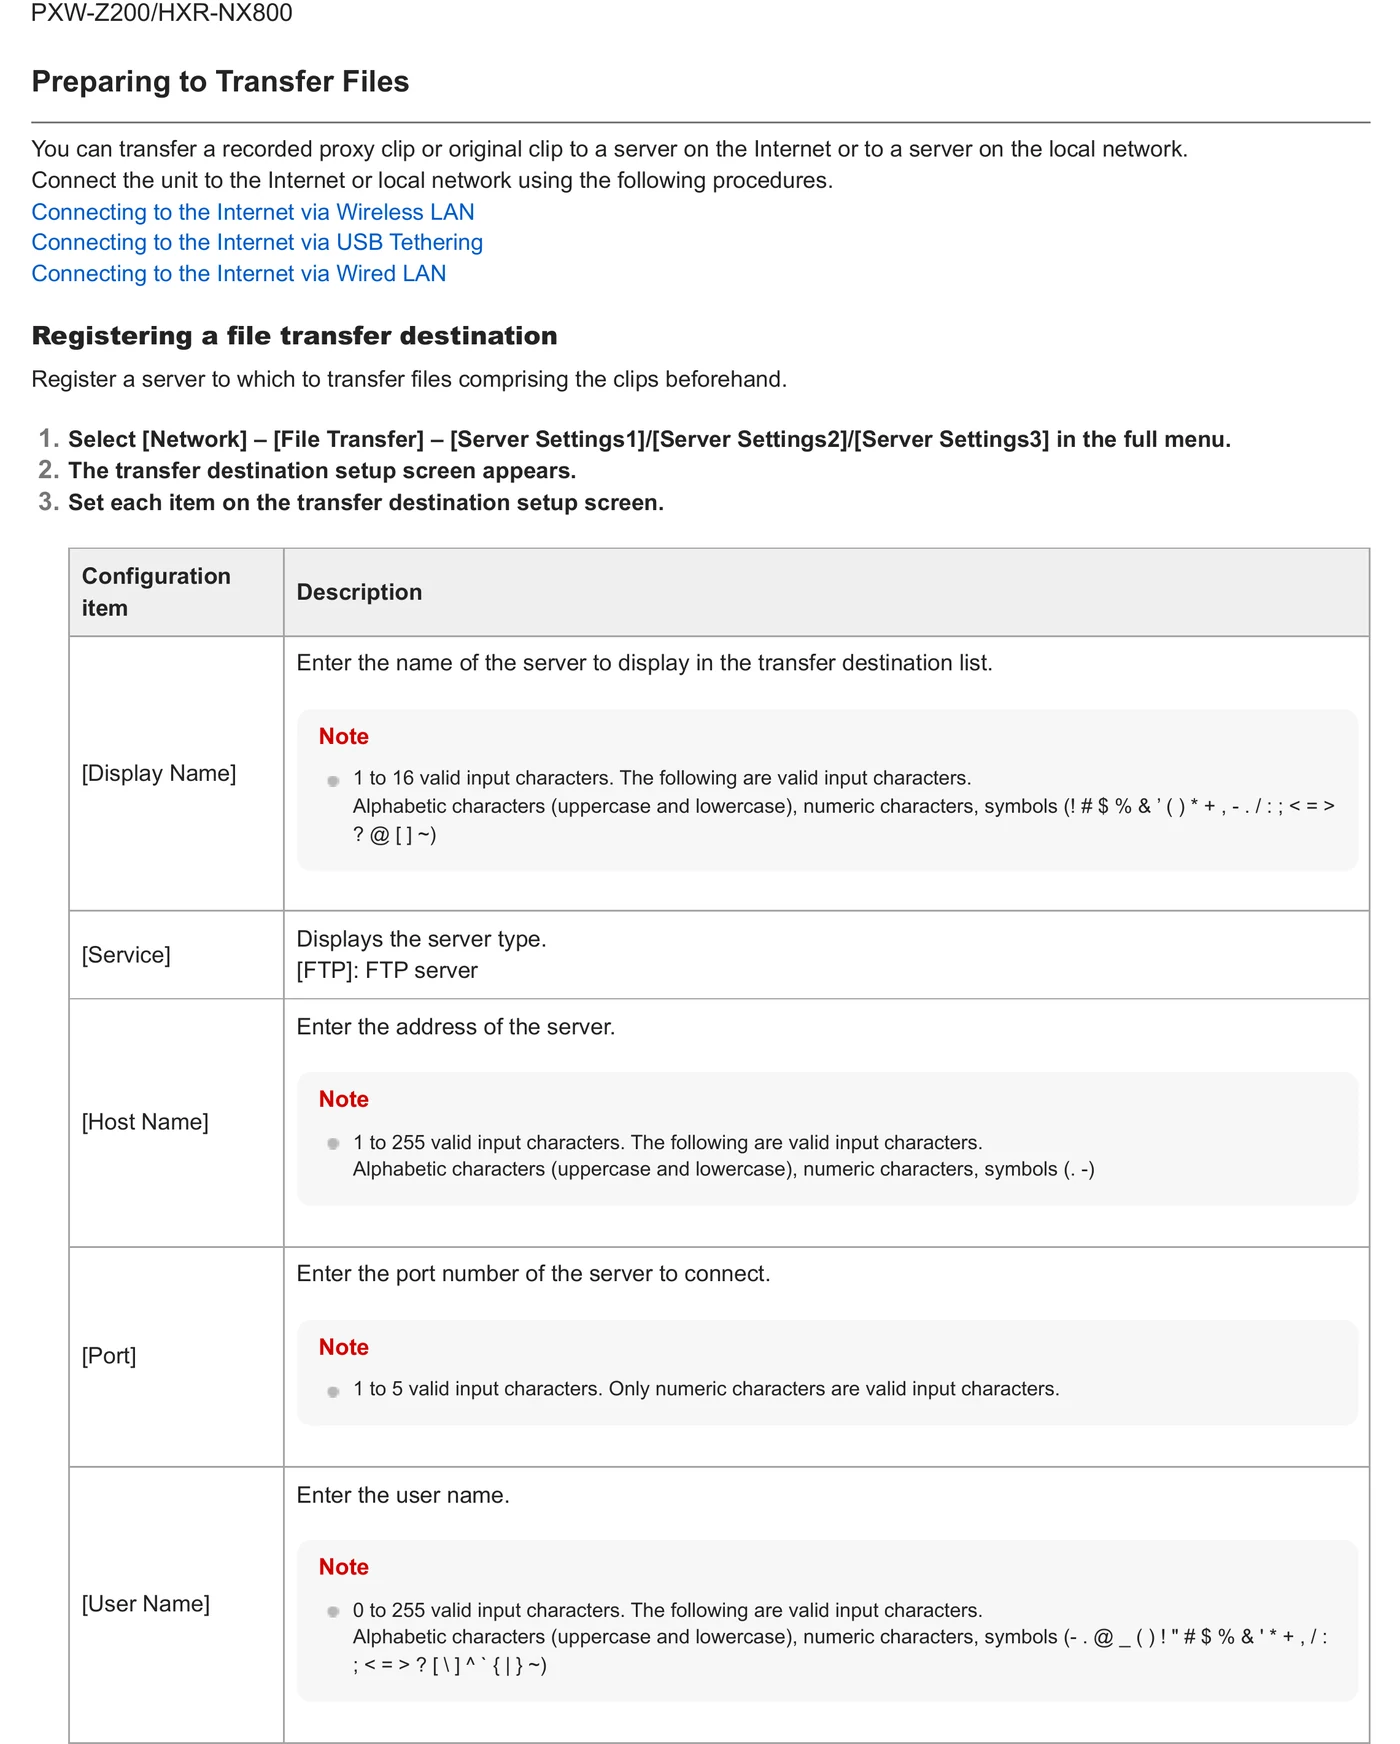
RELATED MODEL MENU REFERENCE · 1/1Shown on Sony PXW-Z200/HXR-NX800; labels can vary on this camera.
Closest reviewed Sony professional-camera reference for the Network, File Transfer and Server Settings sequence.
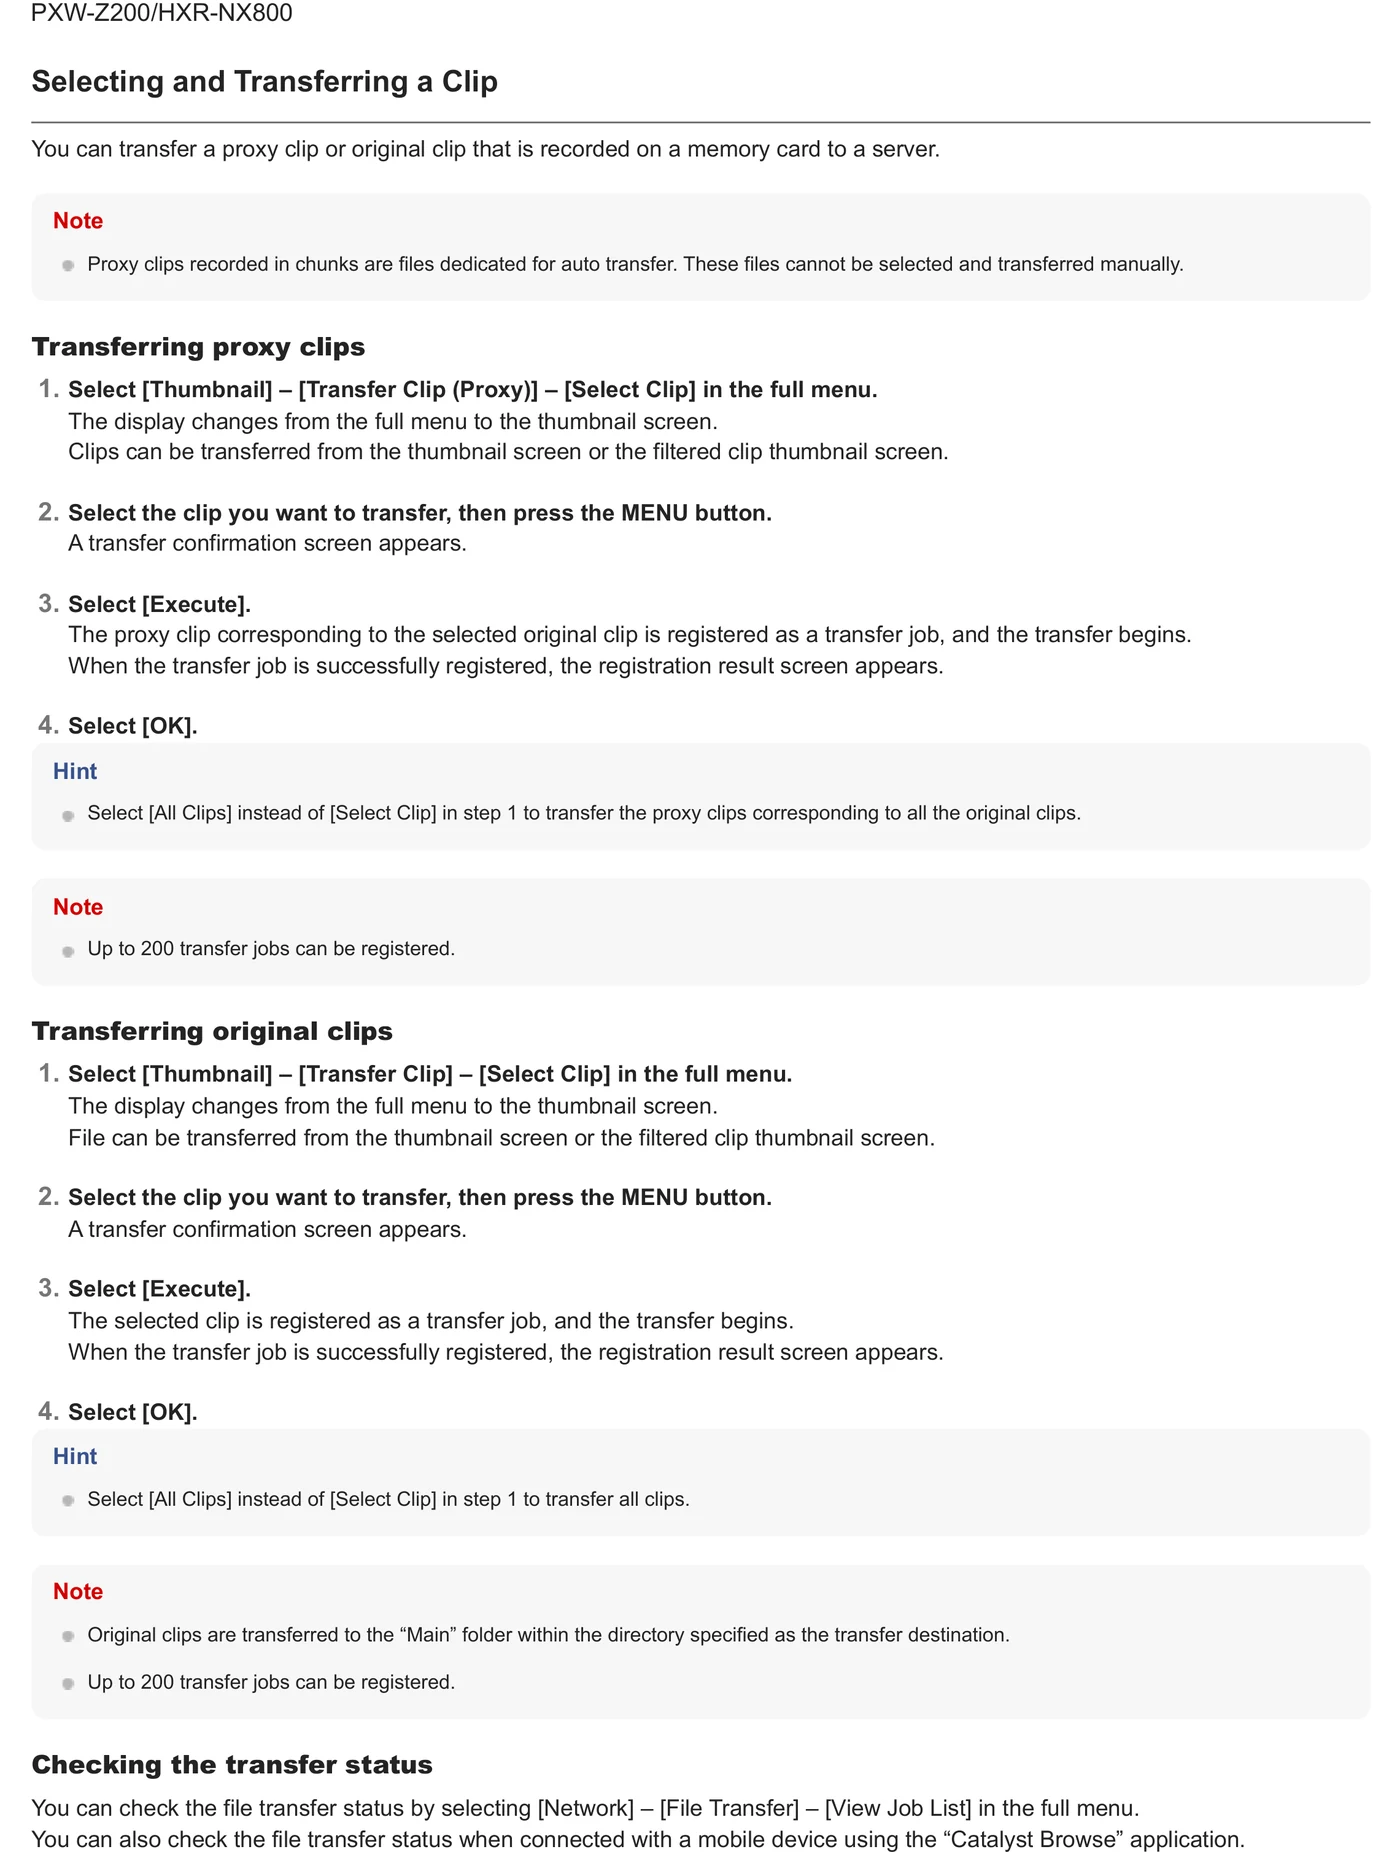
Select the intended media class and server. Documented behavior: manual, auto upload, and chunk proxy transfer on supported firmware.
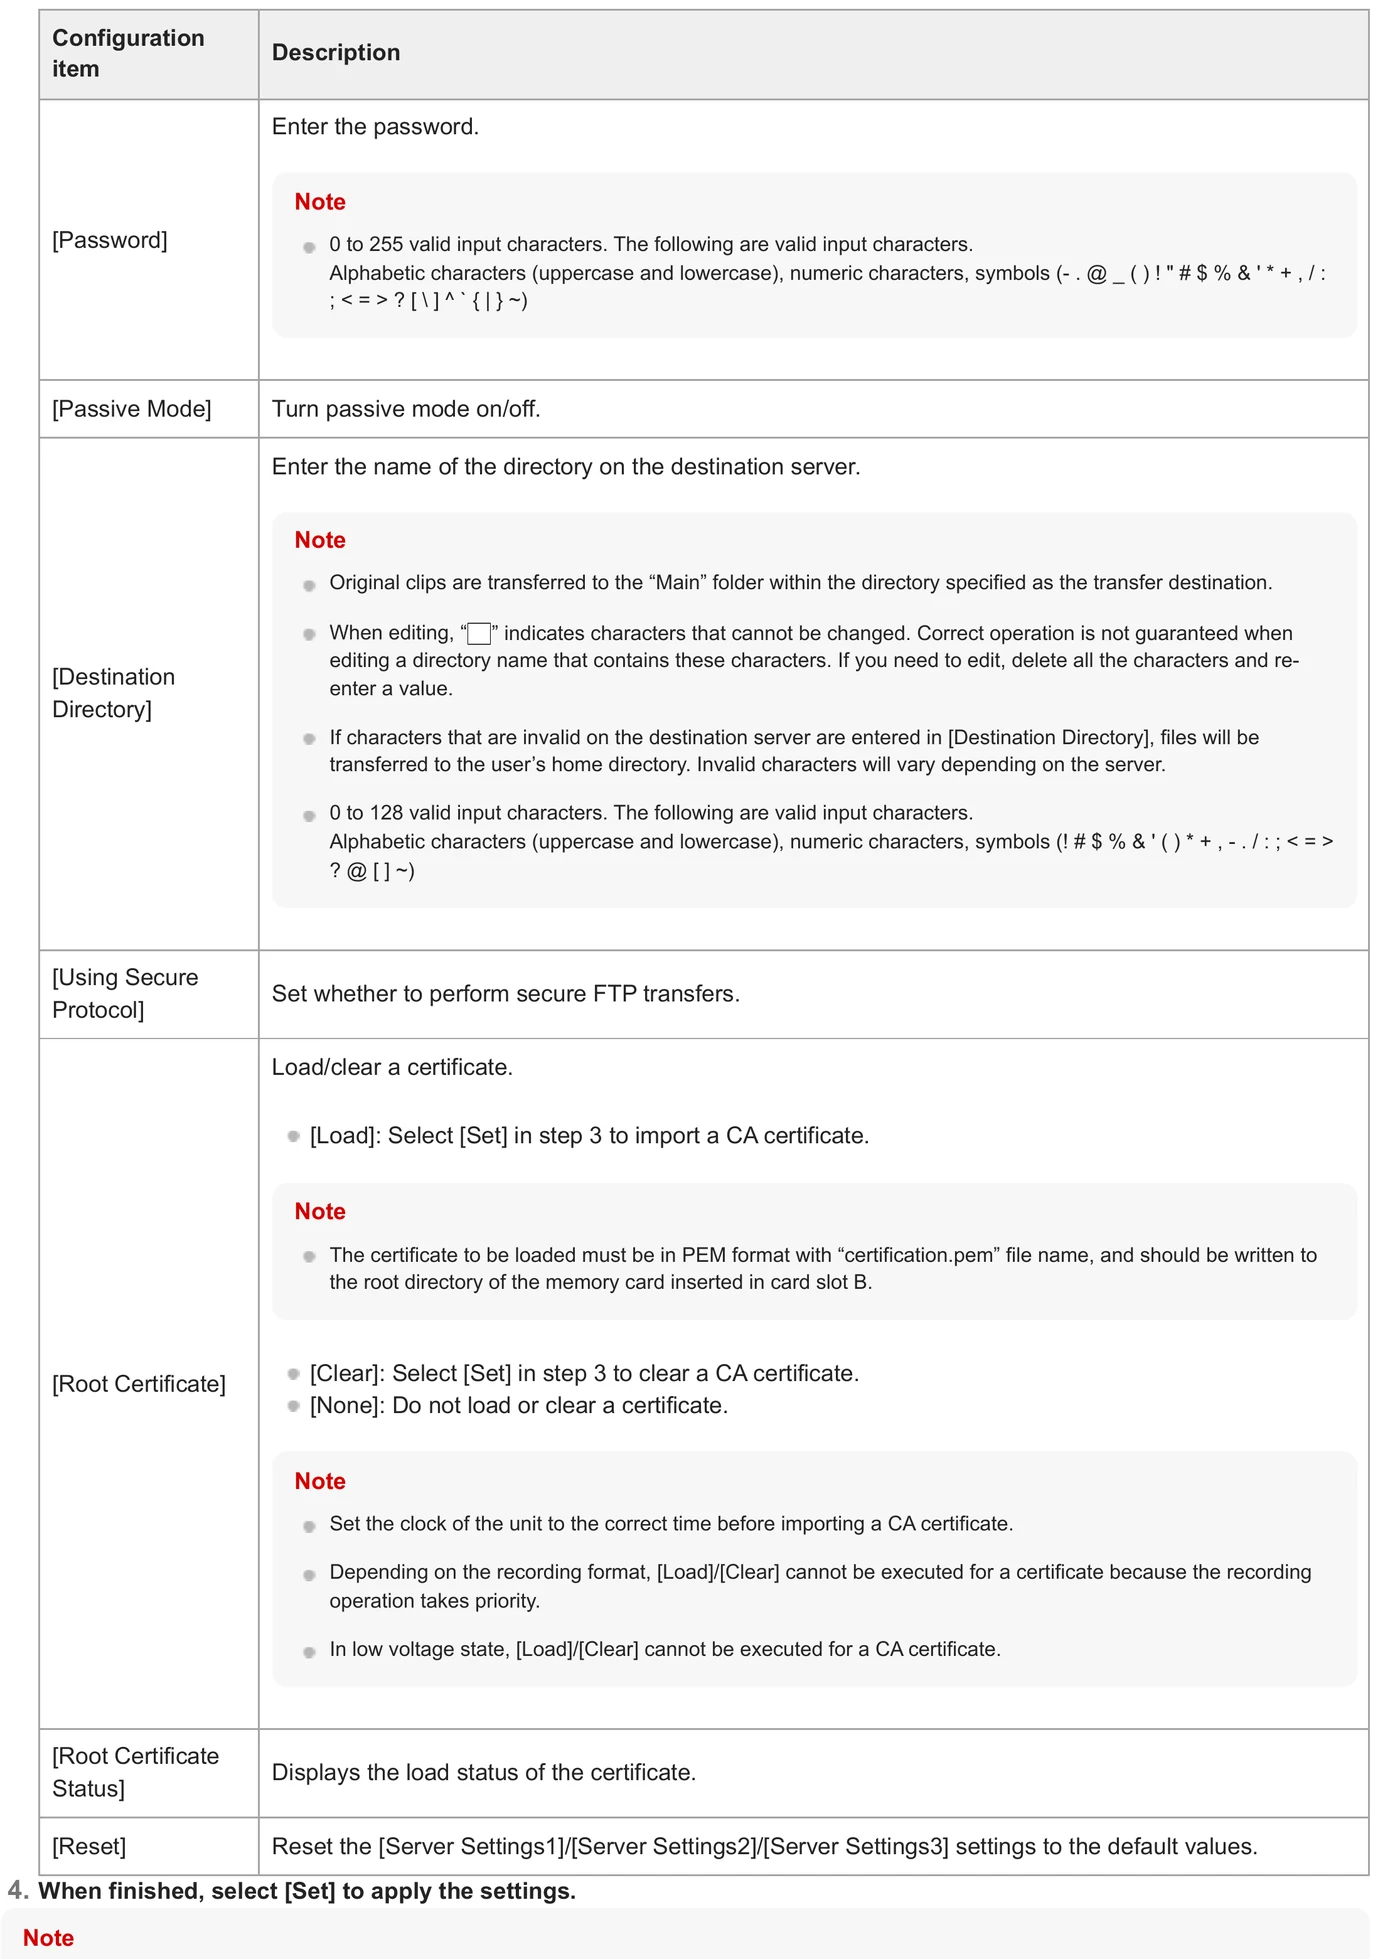
RELATED MODEL MENU REFERENCE · 1/2Shown on Sony PXW-Z200/HXR-NX800; labels can vary on this camera.
Closest reviewed Sony professional-camera reference for the Network, File Transfer and Server Settings sequence.
Sony PXW-Z200/HXR-NX800 Help Guide · PDF p. 190 ↗Related-model instructional excerpt from an official Sony help guide; copyright remains with Sony.RELATED MODEL MENU REFERENCE · 2/2Shown on Sony PXW-Z200/HXR-NX800; labels can vary on this camera.
Closest reviewed Sony professional-camera reference for password, passive mode, destination directory and secure-transfer fields.
Manual path: manual, auto upload, and chunk proxy transfer on supported firmware.
Automatic upload is available on this documented path.
Where chunked proxy upload is offered, treat it as a distinct mode from post-recording original-file upload.
Media behavior
Documented payload classes: high-resolution original clips, proxy clips, partial clips.
Proxy, original/high-resolution, partial, and chunked transfers are separate choices where present; verify the selected type before the event.
Use the camera or adapter job/status list as the first completion signal, then verify the object at the destination.
Limits and warnings
Required path/hardware: XDCA-FX9 expansion unit for wired Ethernet; supported cellular modem for mobile broadband.
A product may also advertise a vendor-cloud workflow; this guide uses only the documented arbitrary-server path and does not treat vendor-cloud-only upload as interchangeable.
C3 chunk/high-res relink workflows cite version 3.00 or later for some settings
Prove it on your body
Run this checklist on the exact body, firmware, network, and media format you will use on assignment.
C3 chunk/high-res relink workflows cite version 3.00 or later for some settings Physical Camera to Anywhere interoperability is not yet lab-verified.
01Register one test server and make it the explicit destination.
02Upload a short proxy or small clip and confirm the transfer job reaches Completed.
03Open the received file and compare its size/duration with the source clip.
04Record which camera/adapter firmware, accessory, protocol, and port passed the test.
05If auto or chunk upload is enabled, record a short new clip and verify the expected original/proxy behavior.
If it will not send
01The File Transfer menu is missing or disabled.
Verify required firmware, option license, adapter attachment, recording state, and that the selected network mode permits file transfer.
02The server cannot be registered.
Confirm host syntax, protocol and port, DNS, passive/active mode, credentials, and the writable destination path.
03Secure FTP reports a certificate error.
Verify date/time, root CA import, server hostname, certificate chain, TLS compatibility, and revocation settings documented for the model.
04Proxy arrives but the original does not.
Check payload selection, auto-upload mode, recording codec/licence restrictions, media availability, and whether original transfer starts only after recording stops.
05A queued job repeatedly resumes or fails.
Check link stability, free storage, server timeout/size limits, adapter power, and camera job-list error text before retrying.
Sources
The local archive keeps this research reproducible if an official link changes. It is not redistributed through this site.
01
Official model or firmware evidence
Networked production and FTP transfer while shooting