← All cameras

Sony ILCE-7C (Alpha 7C) FTP setup

FTP · FTPS/secure FTPDirect camera client2020

ILCE-7C (Alpha 7C) can initiate FTP, FTPS/secure FTP transfer of still images over Wi-Fi infrastructure/hotspot. The documented route accepts a user-configured server; it is suitable for a destination-neutral ingest gateway after protocol, firmware, and payload testing.

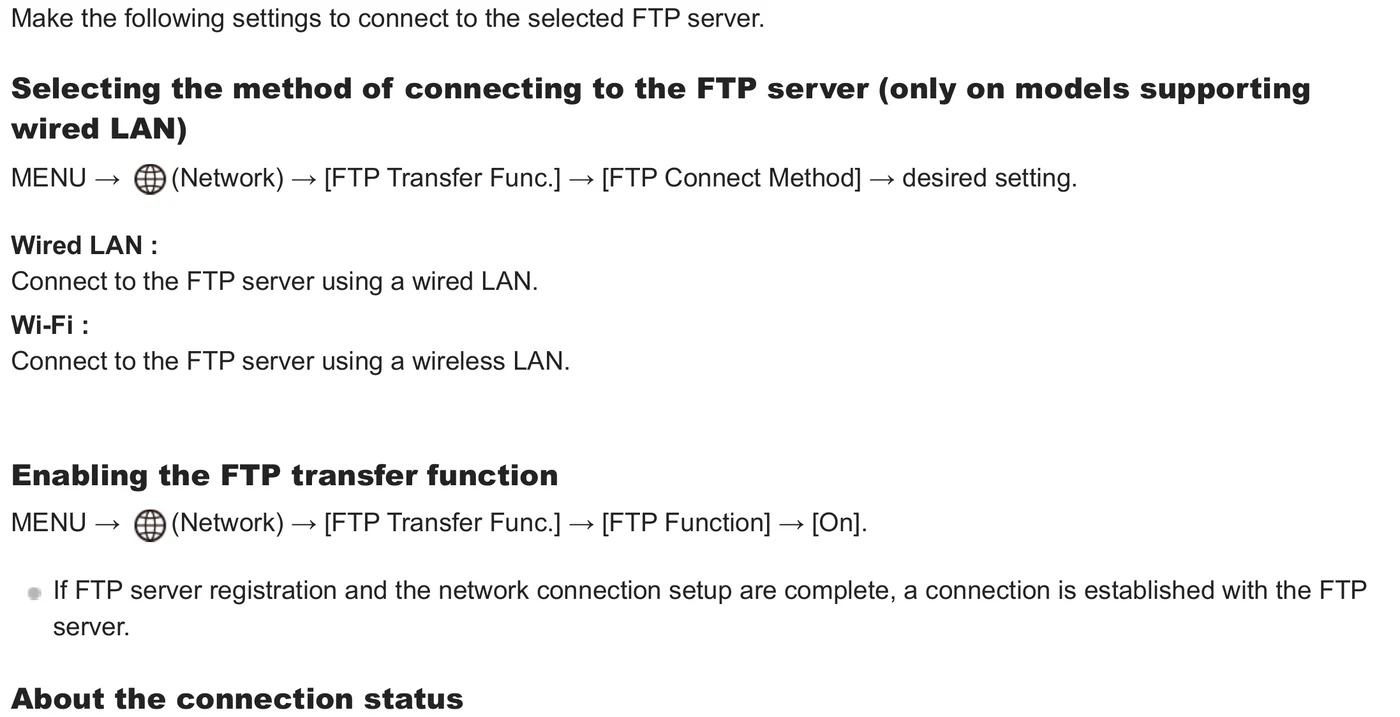
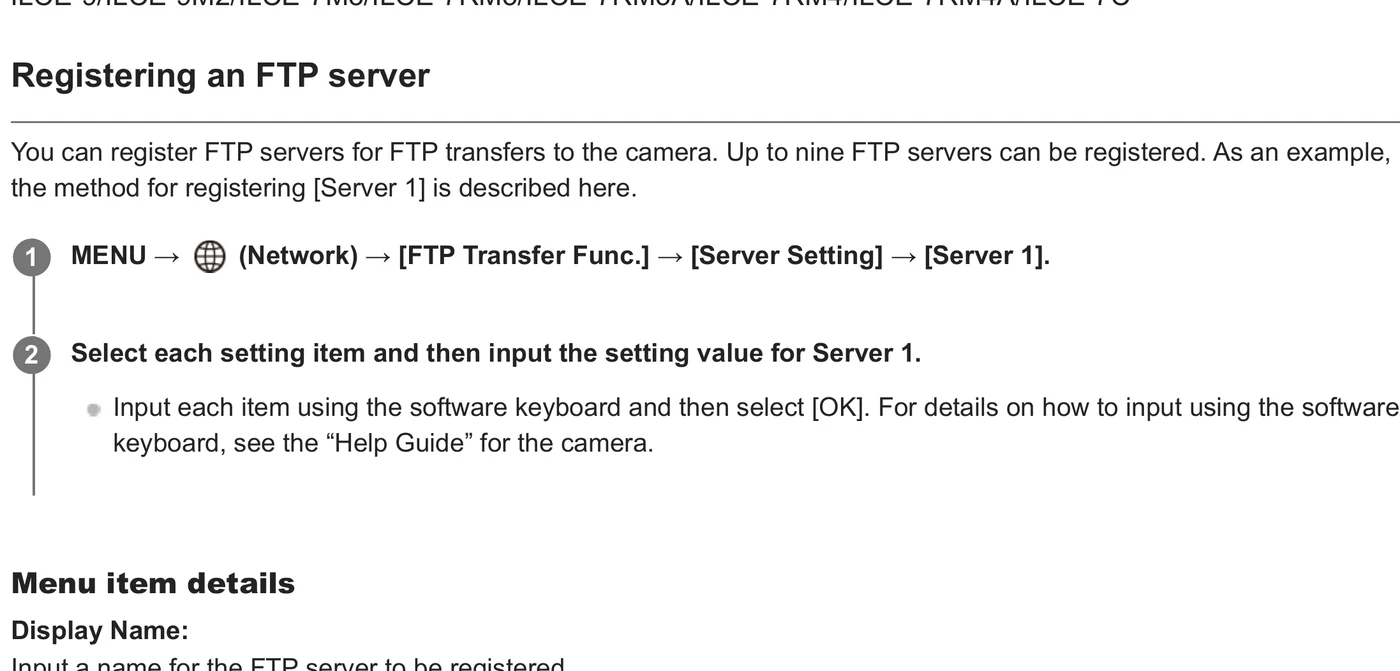
Menu path: Configure the network route > MENU → Network → FTP Transfer > FTP Transfer Func. → Server Setting → Server 1 > Destination Settings / User Info / Directory Settings > FTP Function → On; Transfer or Auto Transfer. Protocols: FTP · FTPS/secure FTP. Sends: still images.

Documented from the manufacturer manual. Sources reviewed .

TransportWi-Fi infrastructure/hotspot
Payloadstill images
Triggersone-image, batch, and auto/background transfer

Before you touch the menu

What to gather

  1. 01Use a network route supported by this body: Wi-Fi infrastructure/hotspot.
  2. 02Have the required hardware ready: none for Wi-Fi.
  3. 03Prepare a reachable FTP, FTPS/secure FTP server account, destination directory, and test file permissions before entering the field.
  4. 04For FTPES/secure FTP, obtain the issuing CA root certificate in the format accepted by the camera and verify the server certificate chain.

Connection fields

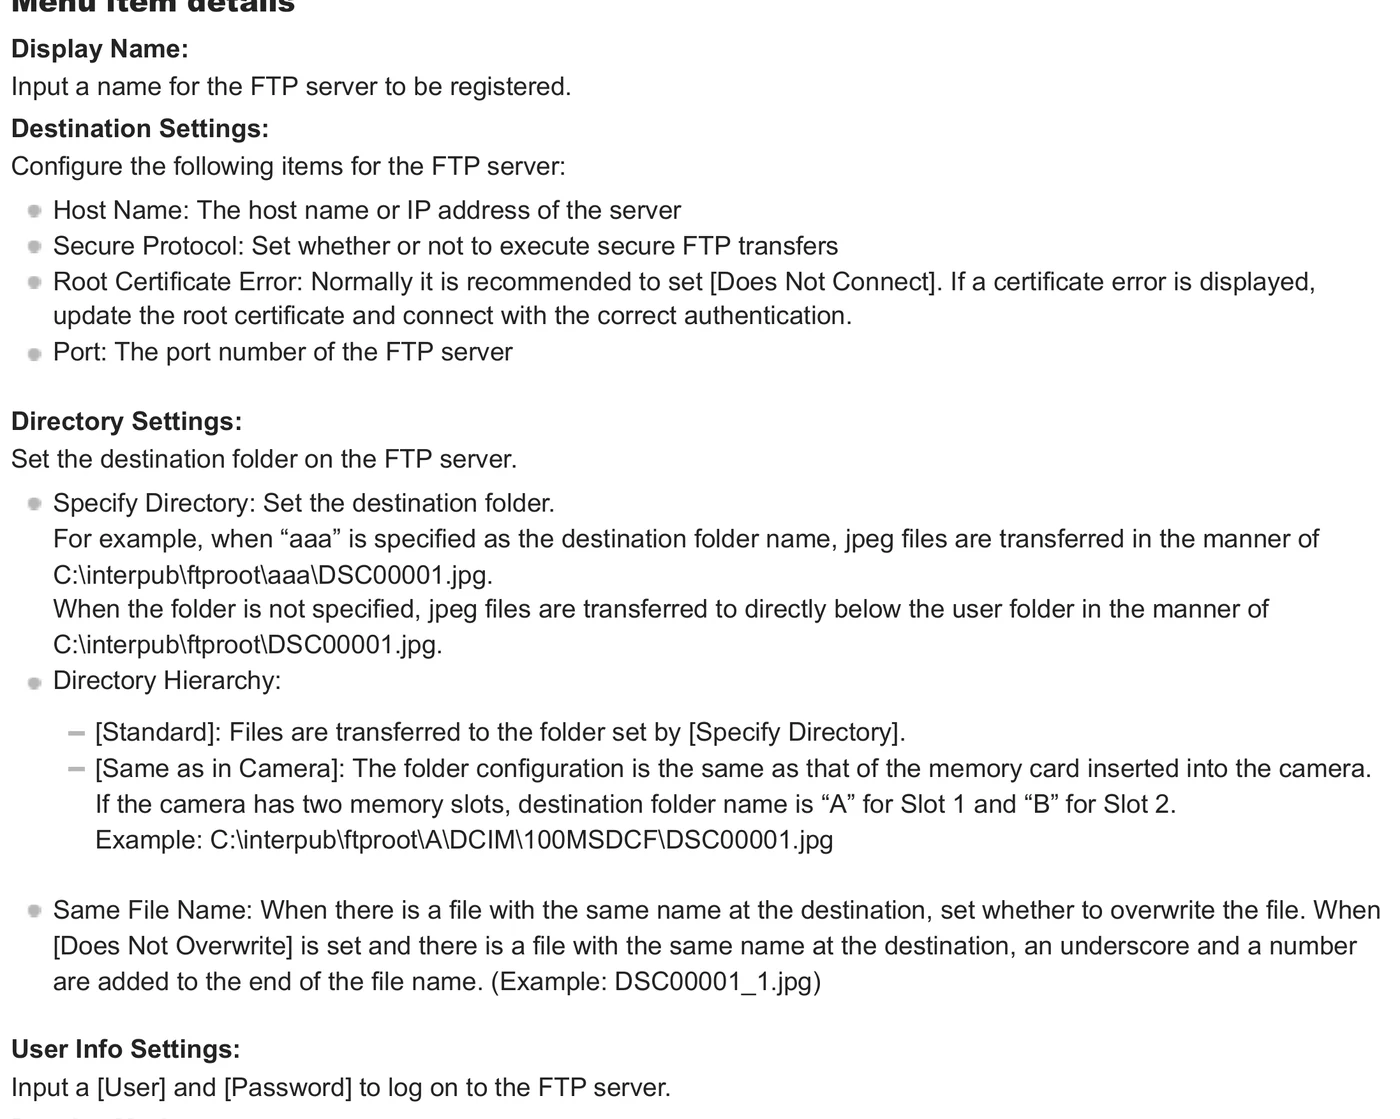
Display Name

A short human-readable label such as Camera to Anywhere Event A.

Lets the operator identify the correct saved destination under pressure.

Host Name

The public DNS name or reachable IP address supplied for the ingest endpoint; do not include a web URL path.

The camera opens its FTP-family connection to this host.

Secure Protocol

Select one of the modes the body documents: FTP, FTPS/secure FTP.

This determines whether credentials and media use plain FTP, TLS, or SSH protection.

Port

The endpoint port supplied with the ingest credentials; use the server value rather than assuming a default.

Camera and server must agree on the listening service.

User / Password

A camera-specific, least-privilege ingest credential.

Separating credentials per camera supports revocation and attribution.

Specify Directory

The remote inbox path assigned to this camera or event.

Keeps simultaneous bodies and clients isolated at ingest.

Passive Mode

Use the mode required by the server/firewall; passive is normally the workable choice behind venue NAT.

FTP data connections fail when the server and NAT/firewall expectations do not match.

Root Certificate / certificate-error policy

Import the trusted CA root and leave certificate validation enabled for production.

FTPES verifies that the camera reached the intended server.

The menu, step by step

What moves, and what does not

Transfer modes

  • Manual transfer is supported: one-image, batch, and auto/background transfer.
  • Automatic/background transfer is documented for this firmware-qualified path; test whether it runs during the chosen shooting and playback state.
  • Use a small one-image transfer first, then a batch or automatic rule only after the endpoint reports a complete file.

Media behavior

  • Documented payload classes: still images.
  • When the menu offers original/proxy or file-type selection, explicitly choose the desired payload rather than relying on the prior job setting.
  • Still-image batches can be large; verify media, battery, and server-space headroom before enabling an automatic rule.

Limits and warnings

  • Network routes are limited to: Wi-Fi infrastructure/hotspot.
  • Plain FTP does not encrypt credentials or media; expose it only through a controlled gateway and prefer FTPES or SFTP when the body supports them.
  • Menu wording and available filters can change with camera firmware; use the guide matching the installed system-software version.

Prove it on your body

Run this checklist on the exact body, firmware, network, and media format you will use on assignment.

Physical Camera to Anywhere interoperability is not yet lab-verified.

  1. 01Send one small still image to the assigned inbox.
  2. 02Confirm the server records the expected camera credential and target directory.
  3. 03Compare the received file size with the camera/media listing and open the file.
  4. 04Power-cycle or reconnect the camera, then confirm the saved server slot still targets the intended endpoint.
  5. 05If automatic transfer is enabled, make one new recording and verify it arrives without a manual selection.

If it will not send

01The server slot will not connect.

Confirm network link, DNS, endpoint reachability, protocol/port pairing, and that the account is allowed from the camera network.

02FTPES fails before login.

Verify camera date/time, CA root import, certificate hostname, TLS compatibility, and certificate-error setting.

03Login succeeds but files do not arrive.

Check the remote directory spelling, user write permission, filename collision policy, media selection, and free space.

04Automatic transfer does not start.

Confirm FTP Function is On, the intended server is selected, the auto/background mode is enabled, and the current recording mode permits transfer.

Sources

The local archive keeps this research reproducible if an official link changes. It is not redistributed through this site.

  1. 01

    Official manufacturer PDF

    Using the FTP Transfer Function

    Open manufacturer source ↗

archived-official-pdf · retrieved 2026-08-26T04:40:28Z · 145 pages

Have this camera? Help us test the path.

Join for free